I finally am able to find the time to write on my blog. I will be explaining everything step by step as much as I can. However, you can check out my youtube videos to have more of an understanding of how I do it. Beware that this will be a pretty long explanation as I cram everything together on this topic. This is from the start and finish of sewing the Hmong money belt/hlab nyiaj along with beading/coining it. Enjoy!
Step 1: This is optional but having a fabric stabilizer makes your money belt more stable, more thicker, and doesn't feel filmsy when beading and coining them afterward.
After I cut out the fabric stabilizer to fit my cross stitch, I iron them to bind them together. At this point, I have not cut the sides or bottom of my cross stitch yet as it feels easier to cut them to how I want it after putting on the stabilizer.
For video on this part of putting stabilizer, click here.


Step 2: After binding the fabric stabilizer on, I will cut the edges out of my cross stitch. For the square, on both sides and ONLY bottom, I count 6 dot out and cut the excess. See picture below. The reason why is because when you put the pink border on, it will be more even and looks more even.
Picture below is how it looks like after cutting off excess from the sides and bottom only. Reason to leave top alone is because you'll be sewing it to bind the main hlab nyiaj/money belt together so it'll be more stable and less chance of tearing.
As for the main money belt, you count 6 dot out on the top and bottom only, leave the sides alone.

Step 3: For the pink border, I purchase the fabric from the Hmong flea market. I bought 3 yards so that was the length of the fabric. As for the width, it's 1 1/2 inches. For video, click here.
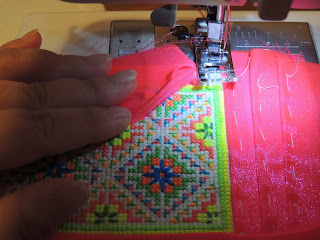
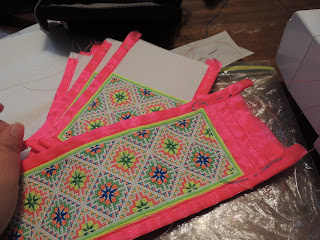
Step 4: The picture below is the side of the main money belt. If you want different colors, you can use different ones. I only have pink available so I use pink. First you fold and use a thread and sew the pink border on before actually sewing it with the sewing machine. I've seen people using pin to pin it down but this is the way how I learn how to make mine so I just feel the it's easier this way for me. It's hard to understand on pictures and easier to understand when watching my video of how to.
After sewing the sides on the main one, you would want to sew the bottom and top. It's hard to explain so watching my video will be way way easier to understand as you can see what I'm doing.
As for the squares, you border around the sides and bottom leaving the top out. Picture below is how the back looks like after sewing on the border.
This is how the corner of the square looks like. I'm not the best at doing this but this works.
Once you are done sewing using red thread for the sewing machine, pull out the white thread.
Step 5: Now onto sewing the square onto the main money belt. The square will go under the main one. I usually sew with white thread to keep it from moving before using the sewing machine. It should look like below. You wil want to make sure all the squares are evenly set on the main one.
Below the white thread is where I sew the pink/red thread with the sewing machine. It'll bind the square to the main one. As for where I put the need between the yellow and green border, I sew it again but with white thread this time to make it extra secure.
This is how the back looks like after sewing it. It won't look pretty yet but I will be covering up the back with another fabric.
Now, take off the white thread.
This is how it looks like after sewing it all together.
Step 6: This step will be covering the ugliness of the back with a nicer fabric or whatever extra fabric you have on hand. I was able to buy this fabric on clearance for $1 a yard so will be using this one. Now, measure out your fabric and cut.
Fold your fabic and sew it by hand making sure your needle and thread doesn't go all the way through to the other side.
Basically how it looks like after I sew the back fabric and after covering it up with clear cover to protect my cross stitch from stains. The clear plastic cover I use are table cloth that you can find at your local fabric store or at Walmart.
Note: To secure the clear cover, I use tape. To have more of an understanding of how I do it, click here to watch my video. The video will also show you how I sew it all together.
After putting on the clear cover, what I like to do is sew up fabric on both ends to I'll be able to tie it together when wearing it. It's optional since this was the original way that was used to do. You can use safety pin to pin it together if you measure the waist or if it's a bit longer. I've seen people using those button for pants. Don't know what's it call but you just hook it up on the side. I don't have a picture of it so you'll have to watch my video to see how it's done with the fabric.
Step 7: Whewwwww...we're finally at the last step!!! Beading and coining time!
For the square, I use 12 beads ( was supposed to use 14 to make it a bit longer but was too late for me once I remember...didn't want to redo everything again). You count 6 beads out for measurement to have it evenly hang. See my video here.
****You can buy the beads at the Hmong store or Hmong flea market; if not, you can get it on Amazon (I bought it from this buyer since I was 3 hours drive away from Hmong store/flea market) but will cost a bit more and you get less beads compare to buying it from the Hmong flea market/store. As for the coin, you can get it from the Hmong store/flea market otherwise I've seen people selling it on facebook (this also applies to the beads as well if you can find someone that sells it).
For the middle part, watch my video to have more of an understanding of how I coin it. I use 14 beads, put coin on it, go up 10 beads leaving the other 4 alone and bead using 4 beads. I count 6-7 beads out for the gap.
The top part, I use 12 beads, if you didn't sew it as wide as how I sew this one, you can use 10 beads (like this one on my other post). The gap is about 6-7 beads apart.
When it comes to beading and coining, you don't have to do as much as I do. Just make the gap farther apart if you want less. I'm making this one for my mom and for me, I like to be a bit heavy handed when putting on coins so it's heavier. The more you put on, the heavier it gets. It's really up to you on how much you want to put on; doesn't have to look like mine.
We are finally done! My son was my model at the time so this is pretty long on him. My tutorial might not be as good but it gives you a slight idea of how to make it. Everyone has their own ways of making it.
The step to step on the how I make Hmong money belt:
1) How to cross stitch for hmong money belt: https://www.youtube.com/watch?v=XRAq8bujRZ8
2) Putting on fabric stabilizer on cross stitch: https://www.youtube.com/watch?v=nXy2H7X2mzs
3) Putting on pink border on money belt: https://www.youtube.com/watch?v=K-KIdk5cjSI
4) Sewing money belt: https://www.youtube.com/watch?v=UeKlHbx6oEo
5) Beading and coining money belt: https://www.youtube.com/watch?v=sUYrlm_1LcI


