Monday, June 4, 2018

New project that still needed to finish


Been very lazy updating my blog and also making new cross stitch project. My toddler keeps me busy all day so now that my other childrens are done with school, I'm able to start back up on what I had left off. 

The project that I had started in the beginning of the year is this sev. I've seen many people selling this kind of pattern on facebook so decided to make one for one of my daughter. From looking at the pattern on pictures, I have to guess on what count I needed to make for this sev to come together from the outer part and inner part which took a lot of mistake but finally was able to do it ( No close up pictures so had guess). Now, I'm almost finished with the sev so once I'm done, I will update the updated picture which then, I will likely start on the other pieces needed for this outfit.


Down below is a small money belt that I did last year but did not put together, I finally sew everything together since my daughter needed one for her school dance. The inspiration for this piece came from a picture from google or on facebook that I found and love. It took me a whole day to do the border, the back, and hang the coin without anyone bothering me.


Saturday, September 9, 2017

Sewing,coining, putting together hmong money belt/ hlab nyiaj


I finally am able to find the time to write on my blog. I will be explaining everything step by step as much as I can. However, you can check out my youtube videos to have more of an understanding of how I do it. Beware that this will be a pretty long explanation as I cram everything together on this topic. This is from the start and finish of sewing the Hmong money belt/hlab nyiaj along with beading/coining it. Enjoy! 


Step 1: This is optional but having a fabric stabilizer makes your money belt more stable, more thicker, and doesn't feel filmsy when beading and coining them afterward. 

 One side should be shiny and the other side isn't. You want to put you cross stitch fabric on top of the shiny side since the shiny side binds the two together.

After I cut out the fabric stabilizer to fit my cross stitch, I iron them to bind them together. At this point, I have not cut the sides or bottom of my cross stitch yet as it feels easier to cut them to how I want it after putting on the stabilizer.
For video on this part of putting stabilizer, click here.


Step 2
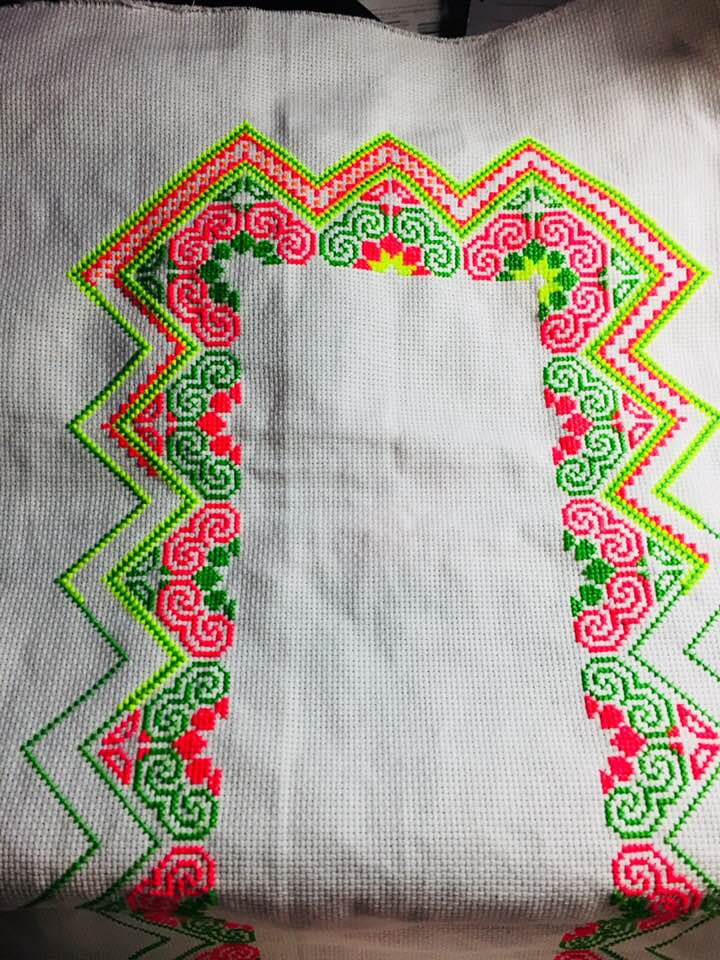
: After binding the fabric stabilizer on, I will cut the edges out of my cross stitch. For the square, on both sides and ONLY bottom, I count 6 dot out and cut the excess. See picture below. The reason why is because when you put the pink border on, it will be more even and looks more even.


Picture below is how it looks like after cutting off excess from the sides and bottom only. Reason to leave top alone is because you'll be sewing it to bind the main hlab nyiaj/money belt together so it'll be more stable and less chance of tearing. 

As for the main money belt, you count 6 dot out on the top and bottom only, leave the sides alone.


 Step 3: For the pink border, I purchase the fabric from the Hmong flea market. I bought 3 yards so that was the length of the fabric. As for the width, it's 1 1/2 inches. For video, click here.


Step 4:  The picture below is the side of the main money belt. If you want different colors, you can use different ones. I only have pink available so I use pink. First you fold and use a thread and sew the pink border on before actually sewing it with the sewing machine. I've seen people using pin to pin it down but this is the way how I learn how to make mine so I just feel the it's easier this way for me. It's hard to understand on pictures and easier to understand when watching my video of how to.

 After sewing the sides on the main one, you would want to sew the bottom and top. It's hard to explain so watching my video will be way way easier to understand as you can see what I'm doing.
 As for the squares, you border around the sides and bottom leaving the top out. Picture below is how the back looks like after sewing on the border.
 This is how the corner of the square looks like. I'm not the best at doing this but this works.
 Once you are done sewing using red thread for the sewing machine, pull out the white thread.

 Another picture of the corner.

Step 5: Now onto sewing the square onto the main money belt. The square will go under the main one. I usually sew with white thread to keep it from moving before using the sewing machine. It should look like below. You wil want to make sure all the squares are evenly set on the main one.


Below the white thread is where I sew the pink/red thread with the sewing machine. It'll bind the square to the main one. As for where I put the need between the yellow and green border, I sew it again but with white thread this time to make it extra secure.


This is how the back looks like after sewing it. It won't look pretty yet but I will be covering up the back with another fabric.

                                                      Now, take off the white thread.
                                       This is how it looks like after sewing it all together.

Step 6: This step will be covering the ugliness of the back with a nicer fabric or whatever extra fabric you have on hand.  I was able to buy this fabric on clearance for $1 a yard so will be using this one. Now, measure out your fabric and cut.


Fold your fabic and sew it by hand making sure your needle and thread doesn't go all the way through to the other side.

Basically how it looks like after I sew the back fabric and after covering it up with clear cover to protect my cross stitch from stains. The clear plastic cover I use are table cloth that you can find at your local fabric store or at Walmart.

Note: To secure the clear cover, I use tape. To have more of an understanding of how I do it, click here to watch my video. The video will also show you how I sew it all together.

After putting on the clear cover, what I like to do is sew up fabric on both ends to I'll be able to tie it together when wearing it. It's optional since this was the original way that was used to do. You can use safety pin to pin it together if you measure the waist or if it's a bit longer. I've seen people using those button for pants. Don't know what's it call but you just hook it up on the side. I don't have a picture of it so you'll have to watch my video to see how it's done with the fabric.

Step 7: Whewwwww...we're finally at the last step!!! Beading and coining time!


For the square, I use 12 beads ( was supposed to use 14 to make it a bit longer but was too late for me once I remember...didn't want to redo everything again). You count 6 beads out for measurement to have it evenly hang. See my video here.

****You can buy the beads at the Hmong store or Hmong flea market; if not, you can get it on Amazon (I bought it from this buyer since I was 3 hours drive away from Hmong store/flea market) but will cost a bit more and you get less beads compare to buying it from the Hmong flea market/store. As for the coin, you can get it from the Hmong store/flea market otherwise I've seen people selling it on facebook (this also applies to the beads as well if you can find someone that sells it).


For the middle part, watch my video to have more of an understanding of how I coin it. I use 14 beads, put coin on it, go up 10 beads leaving the other 4 alone and bead using 4 beads. I count 6-7 beads out for the gap.

The top part, I use 12 beads, if you didn't sew it as wide as how I sew this one, you can use 10 beads (like this one on my other post). The gap is about 6-7 beads apart.

When it comes to beading and coining, you don't have to do as much as I do. Just make the gap farther apart if you want less. I'm making this one for my mom and for me, I like to be a bit heavy handed when putting on coins so it's heavier. The more you put on, the heavier it gets. It's really up to you on how much you want to put on; doesn't have to look like mine.


We are finally done! My son was my model at the time so this is pretty long on him. My tutorial might not be as good but it gives you a slight idea of how to make it. Everyone has their own ways of making it. 


The step to step on the how I make Hmong money belt:
1) How to cross stitch for hmong money belt: https://www.youtube.com/watch?v=XRAq8bujRZ8
2) Putting on fabric stabilizer on cross stitch: https://www.youtube.com/watch?v=nXy2H7X2mzs
3) Putting on pink border on money belt: https://www.youtube.com/watch?v=K-KIdk5cjSI
5) Beading and coining money belt: https://www.youtube.com/watch?v=sUYrlm_1LcI


Sunday, July 30, 2017

Hmong money belt/hlab nyiaj cross stitch


Apparently I don't know why my blog looks so weird. Will recheck in a few days. Another that I would like to add is that I tried to upload the video on youtube but seem like the program that came with my computer isn't uploading it properly. So I'll be busting out my laptop and redo everything again. I also was able to find extra stabilizer fabric so will be uploading more pictures soon.

I'm finally done sewing the money belt for my mom. Now, I just need to go out and buy some fabric stabilizer before I start cutting, bordering, and sewing everything together. I don't know what kind of fabric stabilizer but will definitely post a picture which you can buy it at your local Walmart or fabric store.

I record step by step but there will not be any talking in there since there are tons of background noise. However, I will explain it on this blog to make it more thorough so you'll have a better understanding of what's going on.


<-------- 43="" and="" any="" around="" aside="" be="" below="" belt="" border="" but="" can="" cut="" decided="" did.="" did="" didn="" do="" don="" fabric="" fold="" for="" from="" goes="" hlab="" i="" if="" inches="" it="" just="" last="" length="" like="" long.="" looked="" made="" make="" making="" measure="" minute.="" my="" not="" of="" one="" or="" originally="" otherwise="" out="" p="" picture="" record="" since="" t="" take="" that="" the="" this="" to="" too="" txoj="" waist.="" want="" what="" where="" which="" wide.="" wide="" wider="" you="" your="">I did not record or take any picture on making the belt/hlab. It's basically the same as the square but you just keep on going. I would say, leave about a few inches at the end so you can border it up with the pink border.
Since I cut my fabric a bit too wide, I decided to add on and make it wider otherwise before it was like the picture right below. If you don't like it wide, you can cross stitch like the one below and border up all around. You can check my pervious post (on this link) of the other money belt that I did so you'll know what I'm talking about.


Choosing what kind of colors you want is your choice. As long as it's vibrant it'll give your cross stich a pop.

Another note to add is that it's up to you if you want 1 or 2 border around your pattern. I like using green and yellow. If you just want one border, use a vibrant yellow for it.

<----- a="" above="" after="" and="" as="" at="" be="" being="" belt="" big="" bit="" border.="" border="" bordering="" bottom="" but="" can="" cut="" did="" everything.="" extra="" fabric="" green="" i="" if="" inbetween="" it="" left="" ll="" longer="" look="" my="" nbsp="" okay.="" on="" p="" picture="" piece="" pink="" putting="" s="" second="" see="" sew="" sewn="" shown="" square="" that="" the="" time="" too="" top="" under="" we="" will="" yellow="" you="">
On the sides and bottom, after putting on the stabilizer to make our fabric thicker, you'll be cutting 6 dots out. If you count from the yellow border, count 6 dots out and cut the excess off. I will have more info when I get to that point. I'm just letting you know ahead of time in case you cut your fabric too short. The reason why I said 6 dots out is because that will ensure our pink border to be put on evenly.

So........let's get started!!!


First, start out by making the green pattern. You can click on the picture to make it bigger.


Second, Make the pink pattern.


Third, Add the border outside of you pattern.


Once, you add the border, cross stitch the color on the inside too.


Last, is make the flower (petal) and border the green/yellow all around.

Since I made the belt/ hlab 43 inches, I made 6 squares. If you have time on your hand, you can make this within weeks. If you don't, it'll take a while to make. My paj ntaub won't be perfect but I'm making it with my own hands and giving it to my love ones. Many people will not appreciate handmade things but I will let you know, it's not something you can do easily in a jiffy. It takes time and dedication. The reason why people are not selling these for cheap is because it's hard work. It take lots and lots of time. You won't realize how much work it is until you make it yourself. It may not be perfect, but it's from your heart and hopefully, will be handed down from generation to generations if kept in good condition.

The reason why I'm making a tutorial of this is to those that wants to learn but don't know anyone that will show them how. My camera isn't that great but at least it will give you an idea of what I'm doing and how to do it.

Again, once I buy the stabilizer and find a quiet alone time, I will show you how to border it and sew it all together.


Finally got the video up on youtube!!!! https://www.youtube.com/watch?v=XRAq8bujRZ8

I upload more videos but don't have time to blog it. Check out my channel on how to put the pink border on, sew it together, and cover it up. At this time, I'm currently trying to record on how I put beads/coins on but my little busybody doesn't agree so I will upload whenever I can. It could be tomorrow or weeks.


Thursday, July 27, 2017

Process of making Hmong money belt, Hlab Nyiaj, soon?????

I posted about the Hmong cross stitch money belt, hlab nyiaj, last year and my sister asked me to show her the process of making it. She knows how to cross stitch but the wants to know how to border it evenly and cover it up. I've learn bits from my mother in law on the process of putting it all together. So, I will be showing picture to picture on the process of bordering it up, sewing it together, covering it up, and coining them. It'll be so much easier than just seeing bits of the process and yet still have to guess on how to make it.


I'm currently trying to finish up on the last square like the one above. It takes time since I have a needy toddler on my hand. Since I made enough for my girls and 3 of my sisters, I'm making this one for my mom. It's definitely a different style compare to the ones that I've been making but yet still similar.

I won't know how long it will take for me to load up everything but I'm trying as best as I could and will put lots of effort in it. It may not be the best looking one but hey, I made it myself and am showing everyone how I did it. If you find a better of making it, good for you. This is the way how I learn it and it works for me.

Wednesday, October 12, 2016

Google Express Review

I was able to use a code from a friend to get $15 to use at Google Express ( www.google.com/express ). I order on Friday and got my things on Monday. I had an allergic reaction to something and my eyes was so swollen that it took 2 days to go back to normal again. I was thinking, how am I'm gonna to shopping with this huge jelly swollen eye? Google express to the rescue! Unbelievable at how fast it arrived to my place. My husband created an account and order on Tuesday and got his the very next day. So far, it's been positive for the both of us. Would we order from google express again? Absolutely! Down below will be the steps on how to get $15 off your order today!

1) Create a google account or if you have one already go to step 2.
2) Go to google.com/express
3) At the top right, mouse over My Account and click on membership
4) Join free for the first 3 months; you can cancel at any time
5) Add your credit card (must be first time credit card on google express)
6) Once you join, shop things up to $15 ($15 at one store = free shipping)
7) At checkout, apply my code UKC8GY3WS to get $15 off your first order

It's free money right there. I spend $17.98. With the $15 off and free shipping, I pay only $4.82. It's for a 20 roll Scott 1000 sheet toilet paper and Bounty 8 pk regular paper roll. Again, my code for $15 off is  UKC8GY3WS. Happy shopping!


Wednesday, April 13, 2016

Paj Ntaub

For the past year, I've been busy taking care of my kids and was doing cross stitch. I was able to finished 4 of my project within 3 months before I had my baby and was able to coin 2 out of the 4 cross stitch. I stopped coining 2 of my cross stitch, hlab nyiaj, since I was starting to get backache coining with a huge stomach so I decided to make 3 more cross stitch for 3 of my sister that aren't married yet. So far after having baby, I'm barely finishing them. Just one more piece to go then I'll have to border it and sew it all together before coining them. I wanted to take picture of the process and totally forgot to, so once I'm done with the ones that I'm currently trying to finish, hopefully, I will remember to take pictures of each step. It will probably take a while since I'm in the process of buying a house.

This is the one that I'm currently trying to finished. I did all of the 6 squares and just need to finish up with the long one that goes around the waist. This is the one that I only took a picture of with my phone when I was starting out.


Below is the how it looks like when I border it up and sew it all together. It took a lot of work.
To me, I feel like this was the hard part. Obviously, it was my first time making these, so my corners aren't that great and I was just starting to get familiarize with my sewing machine. It was a lot of steps and very very back breaking. When it comes to coining, it's a bit easier once you get it but very back breaking.


The picture below is the one that my mother in law made for my daughter. It was my first coining and didn't do too bad.


With these, it takes a LOT of patience and time. After making these, I now understand why they're so expensive. It's a lot of hard work and best done with no infant/toddler around.


April 24, 2016

Update:

I found a picture of the first 4 cross stitch that I did early last year.


Wednesday, May 27, 2015

Zojirushi Classic Bento Vacuum Lunch Jar Review

I will be doing a review on the Zojirushi classic bento vacuum lunch jar. It's more like my husband review since he was the one that mainly use it. The lunch jar is supposed to help keep hot foods hot or cold foods cold without the need to having to microwave it or required refrigeration for about 6 hours.

Last year my husband went through a phase where he would only bring sandwiches/salad to work only because he was tired of waiting in line to use the microwave at work. It takes him almost 5 minutes to walk to the lunch room and from there, there would be a line. Since the microwave is small with low watts, it takes longer to heat up foods so the line barely gets going. By the time he's done heating his foods, he only have about 5-8 minutes to eat before walking back to his work station. He feels rather rushed.

    After complaining about being so sick and tired of sandwiches and salad, I did some research and came upon the zojirushi lunch jar. There were so many option to choose from but I decided to get the classic bento vacuum lunch jar. My husband was iffy about it since it was about $50, which is pretty pricey, but I rather have him eat regular foods than eating sandwiches that won't fill him up. On the side note, we're asian so rice will fill us up better rather than sandwiches/salad.

    The reason upon deciding on the brand zojirushi; there's thermos and tiger brand, I bought a zojirushi rice cooker on amazon two years ago and love it. I had no problem with it at all so my thoughts on the brand was positive.

     Once the lunch jar came in, I use it immediately the next day. There was no need no carry lunch cooler as it came along with a bag already. You don't even need to refrigerate the food and just leave as if in the jar.


   As shown in the picture, it came with 3 container. The smallest one is basically for soup which I use for the main dish. If there's liquid, it will leak a bit but not enough to cause a mess; you just need to wipe it. It's small but enough to fill my husband up till he comes home from work; yes he does have a big appetite. The second/middle container is the biggest of the three. I use it for rice. As for the the third/top container, I don't use it often unless I have extra cookies lying around for hubby or if he wants to pack pepper to work. The container do have a smell to it after a while but it doesn't bother me as much. It's not incredibly smelly but enough to bother some people. Once filled with food, it's not noticeable. I usually microwave with the lids off and that was the first couple of months only.

     The whole container itself or the jar (the one you put all three small container/tupperware in it) is really easy to clean. If I pack food with liquids, there will be a small spill; more like leaks, it won't stain there or cause it to be smelly if not clean after a few days and comes off easily. The soup/liquid container is sometime hard to twist open. I love how the whole container itself have a place to put the chopstick; the only thing that I wished was another place to put the spork instead of having to put it in the bag. The chopstick is plastic while the spork is a very good quality spoon/fork that will last for a long time. For the bag,it fits in everything nicely and I was even able to fit in a can of pop at the top along with a few napkins on the inside pocket. So far, its been a year and a half and still no rip or any type of wears from the bag. Everything is still in good condition.

    **So the question is: Does it keep hot foods hot?
                    The first couple of months, before I put in the three container filled with food, I would fill the jar with hot tap water first to ensure that it keeps the food hot/warm longer by the time my husband eats which on the instructions, it says up to 6 hours. I pack an hour or two before he goes to work, he drives 45 minutes to work, and doesn't eat till 6 hours later. From what my husband says, the food are still hottish warm when he eats. He doesn't need to microwave anything and just eat it right off the bat. The last few months, I've been packing a few hours early and didn't heat up the jar like I usually do which the food are still  hottish warm but not cold enough to need reheating.


     ** Does it keep cold food cold?
                     I have not yet tried it with cold food at all. I don't even think it will fit a sandwich unless you cut it up into small pieces.


     Overall, to me, it's definitely worth the money spent. I saved money on food and my husband gets a good meal during work without the need to wait in line or having to eat in a rush. The price may steer most away but I assure you that it's worth every penny. His coworker had asked him about it since it's different and they actually like the idea of not having to reheat their foods again but the price factor steer them away. I too wouldn't had spent money on it if not for my husband complaints about having to wait in a long line to reheat his food and not having enough time to eat by then.


Click link to the Zojirushi Classic Bento Vacuum on Amazon.com